Selecting the Best Diecast Paint Understanding Your Options
Choosing the right paint is the cornerstone of a successful diecast model painting project. The market offers a plethora of options, each with its own set of advantages and disadvantages. Understanding these options is the first step toward achieving a professional-looking finish for your models. Consider the desired finish, the level of detail required, and your experience level when making your selection. The best paint for your diecast car will depend on the specifics of your project and what you are trying to achieve with the model. Factors like durability, ease of use, and the availability of colors will all influence your final decision, so take your time and research the options before starting.
Types of Paint for Diecast Models
Several types of paint are commonly used for diecast models, each with unique properties that cater to different needs and preferences. These include enamel, acrylic, and lacquer paints. Each type offers a distinct set of characteristics regarding drying time, durability, ease of application, and the final appearance of the model. A thorough understanding of these paint types is essential for selecting the right paint for your project and achieving the desired results. Experimenting with different paint types can help you find what best suits your style and the specific demands of your diecast models.
Enamel Paints for Diecast
Enamel paints are known for their durability and are often chosen for their resistance to wear and tear. They dry to a hard, glossy finish, making them ideal for models that will be handled frequently. Enamels typically have a longer drying time compared to acrylics or lacquers, allowing for more time to correct mistakes. However, this longer drying time can also mean that dust and debris are more likely to settle on the surface. Enamel paints usually require the use of mineral spirits or a similar solvent for thinning and cleaning. Because of the solvents, it’s important to use them in a well-ventilated area.
Acrylic Paints for Diecast
Acrylic paints are a popular choice among modelers due to their ease of use and quick drying times. They are water-based, making them less toxic and easier to clean up than enamel or lacquer paints. Acrylics are also less likely to emit strong odors, improving the overall painting experience. Acrylics come in various finishes, from matte to gloss, offering flexibility for different modeling projects. However, acrylic paints can sometimes be less durable than enamels. Acrylic paints can be thinned with water or specialized acrylic thinners. Always follow the manufacturer’s instructions for best results. Image of paint types can be found on this website.
Lacquer Paints for Diecast
Lacquer paints are prized for their incredibly smooth finish and rapid drying times. These paints dry very quickly, which allows for multiple coats to be applied in a short amount of time. Lacquers are known for their vibrant colors and high-gloss appearance, making them suitable for producing stunning, show-quality finishes. Lacquer paints typically require the use of a lacquer thinner, and it’s essential to use them in a well-ventilated area. Due to their fast-drying nature, they can be more challenging to work with for beginners, as corrections must be made quickly. Lacquer paints are an excellent option for achieving a professional finish on diecast models.
Preparing Your Diecast for Painting Surface Prep

Proper surface preparation is critical for paint adhesion and a smooth, even finish. Before applying any paint, your diecast model must be thoroughly cleaned and prepped. This involves removing any existing paint, cleaning off any oils or debris, and creating a surface that the new paint can bond to effectively. This step is often overlooked, but it is one of the most important aspects of a successful paint job. Taking the time to properly prepare your diecast model will significantly improve the final appearance and durability of the paint. Good surface preparation means less chance of imperfections and a more professional look.
Cleaning Your Diecast Model
The first step in preparing your diecast model is to clean it thoroughly. This removes any dust, dirt, grease, or oils that may be present on the surface. Use warm, soapy water and a soft brush to gently clean the model. Rinse it thoroughly and allow it to dry completely. For more stubborn grime, consider using a degreaser or a specialized model cleaner. Make sure to get into all the small details and crevices. Cleaning is vital because contaminants can prevent paint from adhering properly, leading to imperfections like bubbling or peeling.
Sanding the Diecast Surface
Sanding the diecast surface is a crucial step to create a slightly rough surface for the paint to adhere to. Use fine-grit sandpaper (around 400-600 grit) to gently sand the entire model. This process removes any imperfections and helps the primer and paint bond more effectively. Be careful not to sand too aggressively, as this could remove detail. Focus on achieving a uniform texture across the entire surface. After sanding, clean off any sanding dust with a tack cloth or compressed air. Ensure you’re wearing appropriate safety gear like a mask during sanding to avoid inhaling dust particles.
Priming Your Diecast Model
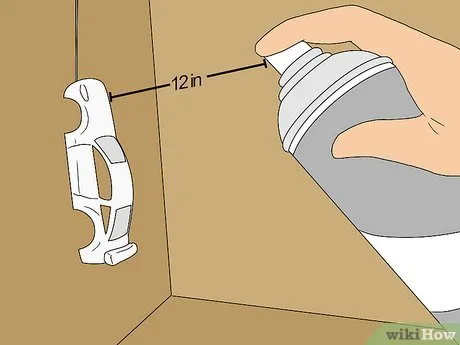
Priming is an essential step in the diecast painting process, creating a uniform surface for the paint to adhere to and improving the overall finish. Primers help the paint stick to the metal surface, filling in minor imperfections and ensuring a consistent color. Apply a thin, even coat of primer, using an airbrush for best results. Allow the primer to dry completely according to the manufacturer’s instructions, and lightly sand with fine-grit sandpaper if needed before applying the paint. Priming is especially important on diecast models as it helps to prevent any potential corrosion and extends the life of the paint job. This image showcases the primer process in detail.
Essential Tools for Diecast Painting
Having the right tools can significantly improve the quality of your diecast paint jobs. Essential tools include an airbrush, paintbrushes, masking supplies, and various accessories. Investing in quality tools can make the painting process easier and more enjoyable. The right tools also provide better control and precision, leading to a more professional-looking finish. Careful selection of these tools will help you achieve a flawless paint job and add to the enjoyment of the hobby.
Airbrushes and Compressors
An airbrush is an indispensable tool for achieving a smooth, even coat of paint on your diecast models. Choose an airbrush with a fine tip for detail work and an air compressor that provides a consistent air supply. Airbrushes allow for precise control over paint application and are ideal for applying thin, even coats. Practice with your airbrush on a test surface before painting your model to get a feel for the paint flow and air pressure. Proper airbrush maintenance is also important; clean your airbrush thoroughly after each use to prevent clogs and ensure it continues to perform optimally. Image of airbrush setup on desk.
Paint Brushes for Detail Work

While an airbrush is great for overall painting, paint brushes are essential for detail work. Invest in a set of high-quality paintbrushes of varying sizes for different tasks. Fine-tipped brushes are necessary for painting small details such as trim, emblems, and interior features. Ensure you choose brushes designed for the type of paint you’re using, as some brushes are better suited for acrylics, while others work best with enamels. Proper brush care, including cleaning them thoroughly after each use, will help them last longer and maintain their performance. Brushes are key to getting those minute details just right.
Masking Supplies for Painting
Masking supplies are vital for creating clean lines and preventing paint from getting where it shouldn’t. Use high-quality masking tape designed for model painting. This tape should have low tack to avoid pulling up the paint when removed. Masking tape is available in various widths, allowing you to mask off intricate details. You may also use liquid mask for more complex curves and shapes. Careful masking allows you to achieve professional-looking results with multiple colors and detailed designs. Take your time with masking to ensure a precise and clean finish. Masking tape and liquid mask options.
The 7 Tips for Stunning Diecast Paint Jobs
Achieving a stunning paint job on your diecast models involves a combination of technique, patience, and attention to detail. Here are seven essential tips to help you achieve professional-looking results.
Tip 1 Choose the Right Paint Type

Selecting the appropriate paint type for your project is fundamental to a good paint job. Consider factors such as durability, the desired finish (matte, gloss, etc.), and your experience level. Researching and testing different paint types will help you determine which one best suits your specific needs. Consider the available colors and finishes when making your choice. Some paints offer a wider range of colors than others. Ensure the paint is specifically formulated for use on diecast models for the best results. Selecting the right paint is the first step in achieving an outstanding finish.
Tip 2 Surface Preparation is Key
Proper surface preparation is the most critical step in the painting process. Thoroughly clean, sand, and prime the model before applying any paint. Removing any existing paint and ensuring the surface is clean and smooth will significantly improve the adhesion and appearance of your new paint job. Take your time with this step, as any imperfections on the surface will show through the final paint. This includes removing any imperfections like scratches. A well-prepared surface is the foundation for a flawless finish. Be sure to wipe down the model with a tack cloth to remove any dust particles after sanding.
Tip 3 Proper Priming Techniques
Priming is a crucial step that enhances paint adhesion, fills minor imperfections, and creates a uniform base for your color coats. Apply thin, even coats of primer using an airbrush. Allow each coat to dry completely before applying the next. A light sanding with fine-grit sandpaper between coats of primer can further smooth the surface. Priming helps to ensure that the paint adheres properly and provides a uniform base, resulting in a superior finish. Image displaying the priming process.
Tip 4 Mastering the Airbrush

Mastering the airbrush is essential for achieving a smooth, professional-looking finish. Practice on a test surface to get the hang of controlling paint flow and air pressure. Maintain a consistent distance between the airbrush and the model, and move the airbrush in smooth, even strokes. Practice applying multiple thin coats to avoid runs or sags. Regular cleaning and maintenance of your airbrush will ensure optimal performance. With practice, you’ll be able to apply paint evenly and create stunning finishes on your models.
Tip 5 Thinning Your Paints Correctly
Thinning your paints correctly is key to achieving a smooth, even finish and avoiding issues like clogs or a rough texture. Use the appropriate thinner recommended by the paint manufacturer. Thin your paints gradually, adding small amounts of thinner at a time, and test the consistency. The correct consistency will depend on the paint type and the airbrush you are using. Properly thinned paint flows smoothly through the airbrush, ensuring a consistent and even application. Experiment with different thinning ratios to find the perfect balance. Be mindful of the environment; humidity and temperature can also affect paint thinning.
Tip 6 Applying Multiple Thin Coats
Applying multiple thin coats of paint is better than applying a single thick coat. Thin coats reduce the risk of runs, sags, and uneven finishes. Allow each coat to dry completely before applying the next. Multiple thin coats build up the color gradually, resulting in a more durable and professional-looking finish. Patience is key; resist the urge to rush the process. Thin coats allow the paint to cure properly and achieve the desired depth of color. Applying too much paint at once can lead to a multitude of problems. Always follow the manufacturer’s guidelines for drying times. Applying thin coats creates the best result and is worth the time.
Tip 7 Sealing and Protecting Your Paint Job
Once your paint job is complete, sealing and protecting it is crucial for long-term durability and preserving its appearance. Apply a clear coat to seal the paint and protect it from scratches, UV damage, and environmental factors. Choose a clear coat that is compatible with your paint type and apply it in thin, even coats. Allow the clear coat to dry completely before handling your model. This extra step protects your hard work and helps your model maintain its stunning finish for years to come. A clear coat is like a shield, providing an extra layer of protection against damage.
Troubleshooting Common Diecast Painting Issues
Even with careful preparation and technique, painting diecast models can sometimes present challenges. Knowing how to troubleshoot common issues can save you time and frustration, allowing you to correct mistakes and achieve the best possible results.
Paint Runs and Sags
Paint runs and sags occur when too much paint is applied at once. To prevent this, apply thin, even coats, and avoid spraying too much paint in a single pass. If runs or sags do occur, allow the paint to dry completely, and then carefully sand down the imperfections. You can then reapply paint in thin coats to fix the issue. Adjusting the air pressure on your airbrush can also help to reduce runs. Properly thinned paint is less likely to run. Patience is vital; wait for each coat to dry before applying the next.
Dust and Debris in the Paint
Dust and debris can ruin a paint job by creating imperfections. To minimize this, paint in a clean, dust-free environment. Before painting, wipe down your model with a tack cloth to remove any dust particles. If dust or debris does get into the paint, allow the paint to dry completely, then carefully sand the area with fine-grit sandpaper and reapply the paint. Investing in a spray booth can help to eliminate dust. Make sure your workspace is clean and free from any particles that could settle on the paint.
Uneven Paint Finish
An uneven paint finish can result from several issues, including improper surface preparation, inconsistent paint application, or incorrect thinning. Ensure the surface is properly cleaned, sanded, and primed before painting. Apply thin, even coats of paint and use the correct thinning ratio. Adjust your airbrush to maintain consistent air pressure. If the finish is still uneven, you may need to sand the surface lightly and reapply the paint. Proper technique and patience are key to achieving a smooth, even finish. Examine the model under good lighting to spot any imperfections.